Raw data
This page is dedicated to recording raw data in SBF format (Septentrio Binary Format) with the MSX system, and to how to choose the recording rate (in Hz) according to the application.
What SBF is
SBF is the native binary format of the mosaic-X5 module. It is compact and efficient and contains everything needed for post-processing:
- carrier-phase and code measurements on all frequencies (for RTK/PPK computation);
- position solution (PVT) and ephemerides;
- receiver status, DOP, signal quality.
Unlike NMEA (text, position only), SBF preserves the raw data: from an SBF log you can recompute positions afterwards (PPK) and convert to RINEX for third-party software.
Where it is recorded (on-board microSD or USB)
The mini carrier has a microSD slot (CN1, see
Carrier mini) wired to the mosaic-X5's native
SD interface. The SBF log can therefore be recorded in two ways:
- on the microSD, in the field, without a PC — this is the way intended for the 400 m: insert the microSD and start/stop recording with the LOG button; the files end up in the DSK1/SSN folder on the card;
- on the PC, over USB — by capturing the module's data stream with a logger (e.g. RxLogger / Data Link from Septentrio RxTools) on the USB COM port.
Tip
For track monitoring the microSD is preferable: the athlete carries only the receiver, no PC in tow. File download happens at the end of the session.
SBF blocks to record
A useful log contains at least the raw-measurement blocks plus the solution:
| SBF block | What it is for |
|---|---|
MeasEpoch |
raw measurements (pseudorange, phase, Doppler) → basis for RINEX and PPK |
PVTGeodetic |
position solution (lat/lon/altitude) and its quality |
PVTCartesian |
solution in ECEF coordinates |
GPSNav / GALNav / … |
constellation ephemerides (for orbit computation) |
DOP |
dilution of precision (satellite geometry) |
ReceiverStatus |
receiver status (diagnostics) |
Tip
For real-time RTK only, NMEA output is enough. SBF is needed when you want to reprocess the data (PPK), produce RINEX, or analyse the measurement quality.
Recording rate (Hz)
By default the receiver outputs at 1 Hz
In the factory configuration (and in the typical MSX configuration) the
receiver outputs at 1 Hz (sec1): one sample per second, enough for
real-time NMEA and classic surveying. 100 Hz is not active by default: it
must be set explicitly (see below) for high-dynamics applications like the
400 m.
The rate is set as the interval between epochs. The mosaic-X5 supports up to 100 Hz. Interval-to-rate correspondences:
| Interval | Rate | Typical use |
|---|---|---|
sec1 |
1 Hz | static survey, standard RINEX, geodetic post-processing |
msec500 |
2 Hz | light kinematic survey |
msec200 |
5 Hz | kinematic, GIS on the move |
msec100 |
10 Hz | fast kinematic, low-dynamics drone |
msec50 |
20 Hz | machines on the move, automatic guidance |
msec20 |
50 Hz | high dynamics |
msec10 |
100 Hz | special applications (see below) |
The 100 Hz case (special applications)
Recording at 100 Hz (msec10) is reserved for very-high-dynamics
applications, where many samples per second are needed:
- monitoring athletes on the track (e.g. 400 m): speed, acceleration, splits and high-resolution trajectory → see 400m on the track;
- drones / UAVs in fast flight and aggressive manoeuvres;
- vibration monitoring and structural dynamics (bridges, antennas, towers);
- vehicles and machines at high speed or with sudden movements;
- testing and commissioning (fine trajectory analysis, IMU synchronisation);
- wideband deformation/seismology.
Warning
100 Hz is not the default and should be used only when really needed:
- it generates very large files (tens of MB per minute) → disk space;
- it easily saturates the port bandwidth → manageable over USB, but on future UART logging the baud rate must be raised;
- it increases the load on the PC logger;
- it does not improve the absolute precision of a single point: it only provides temporal resolution.
For classic topographic surveying 1–10 Hz is more than enough.
Note
The position value (PVT) can be generated up to 100 Hz; for very-high-rate raw measurements, check the enabled constellations/signals, as they affect the data load. (detailed parameters to be confirmed on the MSX Main configuration)
How to set up logging
Via the web interface (recommended)
- Connect USB and open
http://192.168.3.1. - Open the Logging menu.
- Press +New SBF stream and select the blocks to log (e.g.
MeasEpoch+PVTGeodetic+ ephemerides); to get RINEX directly, tick the Rinex option. - In the Interval field choose the rate (e.g. 1 sec for 1 Hz, 10 msec for 100 Hz).
- Confirm: recording starts and the files are saved in the DSK1/SSN folder (microSD on carriers that provide it) or captured on the PC over USB.
Note
The real-time NMEA is configured instead from the Communication → Serial Port menu (or on the USB port), via NMEA/SBF Out → +New NMEA stream: there you pick the sentences and the output Interval (typically 1 sec).
How to set 100 Hz (step by step)
For the 400 m you need 100 Hz, i.e. one epoch every 10 ms:
- In the web UI open Logging and press +New SBF stream.
- Select the blocks: at least
MeasEpoch+PVTGeodetic, plus the ephemerides (GPSNav,GALNav, …) for PPK. - In the Interval dropdown choose the densest value, 10 msec (= 100 Hz). Be careful not to confuse it with 100 msec (which is 10 Hz).
- Confirm and save the configuration as Boot (
Admin → Configurations, Current → Boot) so it stays active after power-off. - Check on the status page that the epoch really runs at 100 Hz before going to the track.
Tip
To reduce the load at 100 Hz, keep the blocks to the minimum needed
(MeasEpoch + PVTGeodetic + ephemerides) and avoid heavy NMEA streams in
parallel: the NMEA for the live monitor can stay at 1 Hz while the SBF
records at 100 Hz.
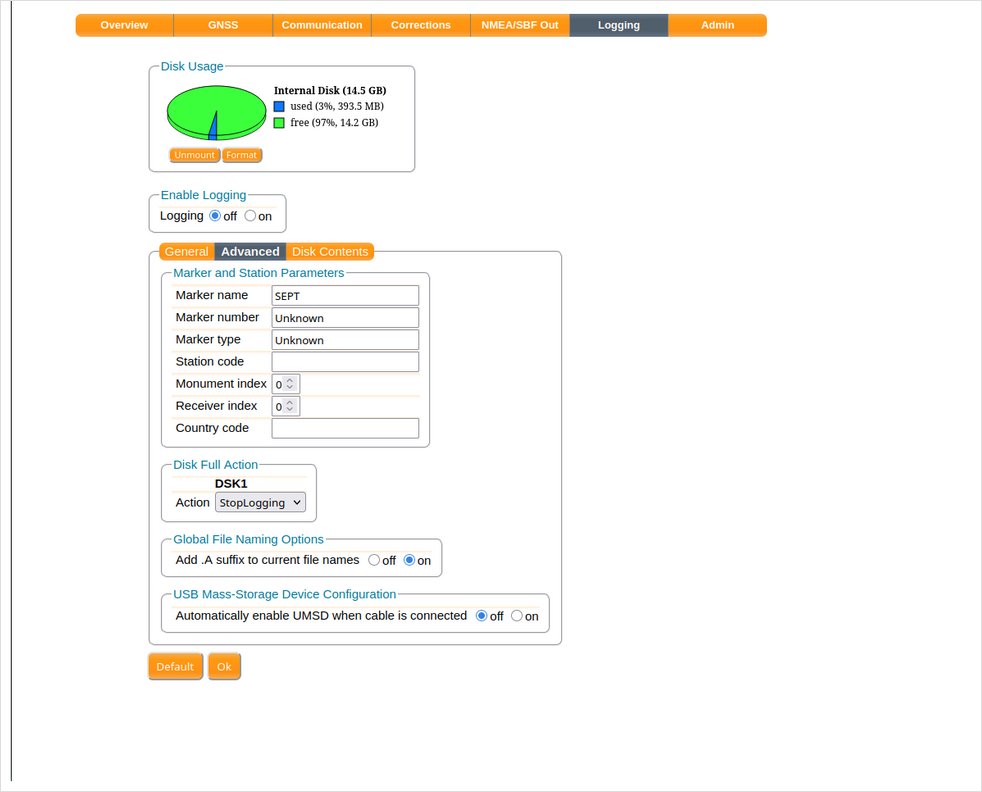
Advanced logging options (Advanced tab)
The Advanced tab of the Logging menu lets you set the station parameters
(Marker name/number/type), the disk-full action (DSK1 → StopLogging)
and the UMSD option (mount the disk as a USB mass-storage device when the
cable is connected, handy for downloading the files).
Via ASCII command (on the port)
Conceptual example of a Septentrio command to direct SBF to a stream with a given interval:
where msec100 = 10 Hz (use msec10 for 100 Hz, sec1 for 1 Hz).
Note
The exact command syntax (stream, destination, file naming) is described in the mosaic-X5 Reference Guide. (to be confirmed for the MSX configuration)
From SBF log to RINEX
To use the data with third-party software, convert the SBF to RINEX with the sbf2rin utility (Septentrio):
From there you proceed with post-processing (PPK) or geodetic analysis.
Where to download sbf2rin (free)
sbf2rin is free and part of RxTools, Septentrio's software suite
(which also includes SBF Converter, with a GUI under Tools → SBF
Converter). Download it from the official site:
Available for Windows and Linux; it may require a free registration. In
RxTools you get the command-line sbf2rin and the SBF Converter GUI to
convert to RINEX, KML, ASCII.
Post-processing with RTKLIB
For kinematic processing (PPK) we recommend RTKLIB, in the RTKLIB-EX 2.5.0 version of the fork maintained by Tim Everett (rtklibexplorer), optimised for low-cost receivers and more up to date than the official 2.4.3 branch:
- Download (Windows): RTKLIB-EX 2.5.0 — GitHub release
- Site and tutorials: rtklibexplorer.com · code and documentation
The full flow has two stages: convert the raw log to RINEX with convbin, then
process it in RTKPOST.
1 · Conversion with convbin (command line)
convbin is RTKLIB's command-line converter (the CLI equivalent of RTKCONV). It
reads Septentrio SBF directly (-r sbf) and produces the RINEX files:
# rover: from the SBF log to RINEX 3.04 (observations + multi-GNSS navigation)
convbin -r sbf -f 3 -v 3.04 -o rover.obs -n rover.nav log__000.sbf
| Option | Meaning |
|---|---|
-r sbf |
Input format: Septentrio SBF. |
-f 3 |
Number of frequencies to extract (3 = L1/L2/L5). |
-v 3.04 |
Output RINEX version (3.04, multi-GNSS). |
-o rover.obs |
RINEX observation file (measurements). |
-n rover.nav |
RINEX navigation file (ephemerides, mixed). |
Tip
Alternatively use the RTKCONV GUI (same options) or convert with sbf2rin.
For the 400 m you need the PostProcess preset blocks (raw measurements +
ephemerides): if you logged them, convbin finds everything in the SBF.
Also get the base data (your own station or an NTRIP / CORS service) for the
same time interval, already in RINEX (base.obs).
2 · Processing with RTKPOST (GUI)
-
Open RTKPOST and load the files:
- RINEX OBS (Rover) →
rover.obs; - RINEX OBS (Base Station) →
base.obs; - RINEX NAV →
rover.nav(or the base navigation).
- RINEX OBS (Rover) →
-
Options → Setting1:
- Positioning Mode:
Kinematic(moving rover); - Frequencies: all available (L1+L2+L5);
- Elevation Mask: ~10–15°;
- Rec Dynamics:
ON(useful for the high dynamics of sprinting); - Integer Ambiguity Res (GPS):
Continuous(robust ambiguity resolution).
- Positioning Mode:
-
Options → Positions: enter the base position (Lat/Lon/H, from the RINEX header or the RTCM antenna).
- Execute: you get a solution file (
.pos) with position and status for each epoch, up to 100 Hz. - Plot to view the track; then export/analyse the
.posto derive speed, acceleration and step-by-step splits.
Tip
At 100 Hz a .pos file has thousands of rows for a few seconds of running:
check that the Q column stays at 1 (ambiguities resolved) throughout the
lap; the Q=2 (float) stretches have reduced precision and should be flagged
in the analysis.
Command-line equivalent
RTKPOST has the CLI equivalent rnx2rtkp (handy for batch-processing many
trials):
where -p 2 = Kinematic mode and -m 13 = elevation mask 13°.
RTKPOST screenshots
The RTKLIB (RTKPOST) interface screenshots belong to their respective authors and are not reproduced here. To see them step by step (Kinematic settings, AR, solution map) refer to the tutorials with real screenshots:
Once you have processed one of your trials, send me a screenshot of RTKPOST with your settings: I will insert it here in place of these links.
See also
- Full execution of the trials: 400m on the track
- USB operating flow: USB operation
- Meaning of the LEDs during logging: Main